Snow in the Holidays...


Taken Sunday night...
The view Monday morning...

Learning Celebration: Cartouches and Mummified Cats

Our Learning Celebration started at 4.30 pm and finished at 5.30 pm.  It was on Wednesday 13th July.  I liked our cats because the had gems on their heads.  I went to different classrooms and saw quilts and koru art.


Making our Mummified Cats

We made mummified cats.  The progress was great.  It took a long time to make them.  We had to roll up newspaper to make the base.  We scrunched up newspaper into a ball for the head.  After we had finished this stage we had to wrap the mummified cats in plaster of paris.

We wrapped the mummified cats in plaster of paris.  Then after we waited overnight for the plaster of paris to dry.  Next when the plaster of paris was dry we glued down linen bandages with PVA glue.

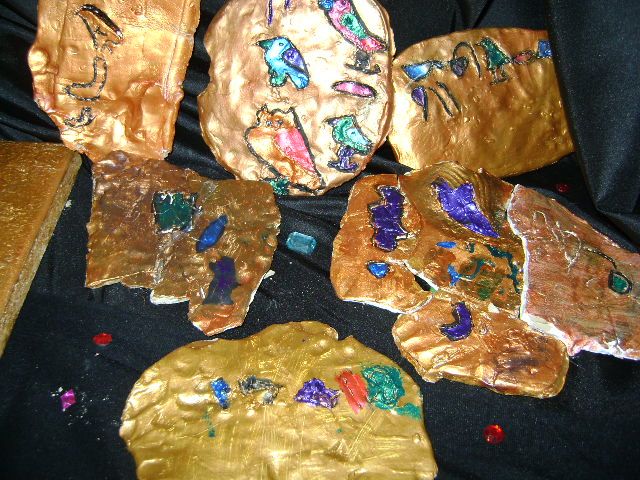
We got strips of the linen and wrapped them round the mummy then glued them down.  We moulded clay around the head and merged the ears and the nose on.  We had to stick our thumbs where the eyes were going to be and push it in.   When the clay was dry we had to paint it with copper acrylic paint.

Then when the paint was dry we brushed it with gold paint about 5-6 times.  We painted on the finer detail with black  Egyptian style eyes and the cats mouth and whiskers.  We painted the eyes green or blue.  We had to set the mummified cats up on a table with a black sheet on it.  The sign said DO NOT TOUCH!


Making our wonderful Egyptian Cats

We made mummified cats and it was hard.  First we had to make the body out of newspaper - it took two people to do it.  Samara helped me with the body.  When we finished step one it was time for step two.  This is the step I liked.  Se had to wrap cats in plaster of paris.  It was so fun and gloppy.  When we finished step two, now it was time to go to step three.  We had to glue bandages onto our cats.  Now it was time for step four.  We had to put clay on the cat's head.  Step five we painted the head.  Cool, now it was time for step six.  This was the last step, we had to put a gem on top of the cat's head.

It took Four Weeks to Make our Egyptian Mummified Cats

For about four weeks we have been making mummified cats.  We used plaster of paris, bandages, newspaper and paint.  My partner was Neco and I put the gem and plaster of paris.


Egyptian Cartouches

We made cartouches.  A cartouche is a tablet or box with a Royal's name on it.  It was usually placed in that Pharaoh's tomb when they died.

We had to mould the clay into a flat tablet shape and carved our hieroglyphic names on it.  Then when the clay was dry we painted it white.  White was the base colour.  When the white was dry we dry brushed over it with gold about six times.  After the gold paint was dry we painted the hieroglyphics, the colours Egyptians would paint them.

Making Egyptian Cats

We had lots of fun making our mummified cats.  First we had to make the base and shape with scrunched up paper.  Then we put plaster of paris around the mummified cats.  After that we put linen around the cats to make them look old.

We put dye over them to make them look really old.  The colours were orange, black and dark orange.  We got some clay and made the head.  It was really hard.  We had heaps of fun.  Then we had to dry brush it to make them look even older.

The next day it looked awesome!  We finished drying brushing and then made posters.  Our learning celebration was called 'Twilight at the Museum.'  We dyed our posters to make them look old and wrote in hieroglyphics.


Cartouches and Mummified Cats

For our inquiry we did Ancient Egypt (what they treasured), so we made mummified cats and cartouches.  First we made the cat out of newspaper and then we wrapped it with grey, white paper.  We went to the round table and wrapped plaster of paris.  Then we used PVA glue and material.  We made a face with clay.  It was really hard because we had to make the ears right.  We dry brushed it then we did the details.

We made a cartouche out of clay and then we painted them white.  Then dry brushed it gold and coloured it.


Making of our Egyptian Cats

These are some photos of how we made our cats.  We finished them on Wednesday and it was fun!  It took us a few weeks.

First you roll up paper.  Tape the paper and put nice paper around it.  Put plaster of paris over top and dye it with old brown dye.  Make a clay head and paint the head with gold.  Put sparkles on it and put it on display.

We enjoyed moulding the head shape.

Egyptian Cats

Room 8 had been making mummified cats.  First we rolled up newspaper.  We had to scrunch up newspaper.  After that we put plaster of paris bandages over it.  Then we put fabric over the plaster of paris.

Next we dried the fabric.  We made a clay mask and we had to mould it.  Then we did dry brushing.  It was fun because we had never done anything like it before.


Making Egyptian Cats

We made some mummified cats from Ancient Egypt.  We had to fold up newspapers to make the body and then we had to make a ball for the head.  Then we had to cellotape it altogether.  Then we had to put the plaster of paris on.  We waited for the plaster of paris to dry and then we had to get some clay for the head. We made the ears and stuck them on.  We had to push into the clay to make the eyes.  We got little pieces of clay and put the nose on.  To make whiskers we used a pencil.  Then we had to dry brush it, they look awesome!


Mummified Cats

We used lovely material to make them look like they were real mummified cats wrapped up.  We used clay to make the heads and carved in the details.  After the clay was dried we painted it with expensive gold paint.  We thought it was awesome!


Making Ancient Cartouches

We made cartouches. We made them out of clay. First we got a chunk of clay. Then we had to make it thick.  When that was done we got a paperclip and did our hieroglyphics in the clay.  We waited for awhile  and when that was ready we painted it white.  Then after phonics we got back and painted it gold or copper.  Then we did some dry brushing.  It did not matter if it broke because Elizabeth would fix it with her glue gun.  When the gold and copper paint was dried we got the coloured paint and coloured in the hieroglyphics.  Then we put black on the lines of the hieroglyphics.


Making Cartouches and Mummified Cats

We painted hieroglyphics.  To make hieroglyphics we had to get some clay and mould our name into it.  We let it dry and then painted with white and let it dry.  Then we painted with gold and then colour in the sides of the carving.  Then did the black lines and let it dry.


To make our cats we used a stick of paper and put a whole heap of newspaper scrunched up.  We wrapped it around and put plaster of paris on it.  We smoother it over and put PVA glue and fabric all over it (you can do a pattern).  You then let it dry and then make a mask out of the clay. You let this dry and then you dry brush with lots of layers of gold and bronze.  You need colours like blue, green an purple.  You can put black lines on the face, where you have carved in with a paperclip.


Thermals: Vulcan Steel

Today we got thermals they are awesome! They are black, some of the children from Room 8 got to have a photo altogether.  Thank you Vulcan Steel who donated the money so 19 schools (on the eastern side of town), could get free thermals to stay warm. 


Sparrow Bird

Today we found a sparrow outside our classroom.  I told Elizabeth and she got art shirts and a box.  We carried the bird inside.  It lived in our room.  I checked on the sparrow before morning tea and it had died.  In the morning it would have heard us singing.


Related Posts Plugin for WordPress, Blogger...